

使用EF Code First搭建简易ASP.NET MVC网站并允许数据库迁移
温馨提示:这篇文章已超过590天没有更新,请注意相关的内容是否还可用!
本篇使用EF Code First搭建一个简易ASP.NET MVC 4网站,并允许数据库迁移。
创建一个ASP.NET MVC 4 网站。
在Models文件夹内创建Person类。
public class Person
{
public int ID { get; set; }
public string FirstName { get; set; }
public string LastName { get; set; }
}
在Controls文件夹内创建PersonController,选择使用Entity Framework的模版、模型类,创建数据上下文类,如下:

点击"添加"后,除了在Controls文件夹内多了PersonController,在Models文件夹中多了PersonContext类,如下:
using System.Data.Entity;
namespace MvcApplication1.Models
{
public class PersonContext : DbContext
{
// 您可以向此文件中添加自定义代码。更改不会被覆盖。
//
// 如果您希望只要更改模型架构,Entity Framework
// 就会自动删除并重新生成数据库,则将以下
// 代码添加到 Global.asax 文件中的 Application_Start 方法。
// 注意: 这将在每次更改模型时销毁并重新创建数据库。
//
// System.Data.Entity.Database.SetInitializer(new System.Data.Entity.DropCreateDatabaseIfModelChanges<MvcApplication1.Models.PersonContext>());
public PersonContext() : base("name=PersonContext")
{
}
public DbSet<Person> People { get; set; }
}
}
在Web.config中的connectionStrings多了如下配置,选择了默认的localdb数据库。
  <connectionStrings>
......
<add name="PersonContext" connectionString="Data Source=(localdb)\v11.0; Initial Catalog=PersonContext-20150210155119; Integrated Security=True; MultipleActiveResultSets=True; AttachDbFilename=|DataDirectory|PersonContext-20150210155119.mdf"
  providerName="System.Data.SqlClient" />
  </connectionStrings>
在Views/文件夹中多了Create.cshtml, Delete.cshtml, Details.cshtml, Edit.cshtml, Index.cshtml这个几个视图文件。
现在,我们想启动EF的自动迁移功能。点击"工具"-"库程序包管理器"-"程序包管理器控制台",输入enable-migrations:

在根目录下多了一个Migrations文件夹,以及生成了一个Configuration类,如下:
namespace MvcApplication1.Migrations
{
using System;
using System.Data.Entity;
using System.Data.Entity.Migrations;
using System.Linq;
internal sealed class Configuration : DbMigrationsConfiguration<MvcApplication1.Models.PersonContext>
{
public Configuration()
{
AutomaticMigrationsEnabled = false;
}
protected override void Seed(MvcApplication1.Models.PersonContext context)
{
//  This method will be called after migrating to the latest version.
//  You can use the DbSet<T>.AddOrUpdate() helper extension method
//  to avoid creating duplicate seed data. E.g.
//
//context.People.AddOrUpdate(
//  p => p.FullName,
//  new Person { FullName = "Andrew Peters" },
//  new Person { FullName = "Brice Lambson" },
//  new Person { FullName = "Rowan Miller" }
//);
//
}
}
}
以上,我们可以添加一些种子数据。
现在需要把种子数据迁移到数据库,在"程序包管理器控制台",输入add-migration initial:

此时,在Migrations文件夹内多了201502100756322_initial类,记录了本次迁移的动作。
namespace MvcApplication1.Migrations
{
using System;
using System.Data.Entity.Migrations;

public partial class initial : DbMigration
{
public override void Up()
{
CreateTable(
"dbo.People",
c => new
{
ID = c.Int(nullable: false, identity: true),
FirstName = c.String(),
LastName = c.String(),
})
.PrimaryKey(t => t.ID);

}

public override void Down()
{
DropTable("dbo.People");
}
}
}
最后别忘了要更新数据库,在"程序包管理器控制台",输入update-database:
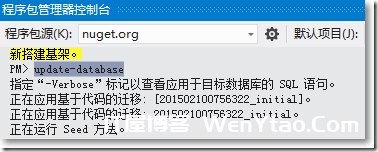
这时候,浏览/Person/Index,能实现所有的增删改功能。
如果这时候,我们希望在Person中增加一个属性,比如类型为int的Age属性。
public class Person
{
public int ID { get; set; }
public string FirstName { get; set; }
public string LastName { get; set; }
public int Age { get; set; }
}
我们如何告诉数据库呢?
还是在"程序包管理器控制台",输入add-migration 名称:
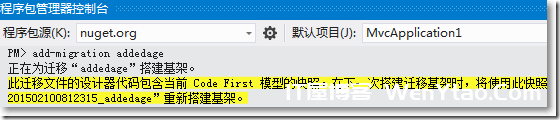
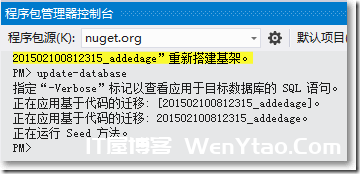
此时,在Migrations文件夹内多了201502100812315_addedage类,记录了本次迁移的动作。
最后,还在"程序包管理器控制台",输入update-database以更新数据库。
为了让视图与当前Person类同步,可以先后删除Person文件夹和PersonController控制器,再重新创建PersonController控制器,选择使用Entity Framework的模版、Person类,PersonContext上下文类。
至此,简单体验了EF Code First创建数据库并实现数据库迁移的方便之处。


