

java中SpringBoot 自动装配的原理分析
温馨提示:这篇文章已超过592天没有更新,请注意相关的内容是否还可用!
关于SpringBoot的自动装配功能,相信是每一个Java程序员天天都会用到的一个功能,但是它究竟是如何实现的呢?今天阿粉来带大家看一下。
自动装配案例
首先我们通过一个案例来看一下自动装配的效果,创建一个SpringBoot的项目,在pom文件中加入下面的依赖。
   <dependency>
	  <groupId>org.springframework.boot</groupId>
	  <artifactId>spring-boot-starter-web</artifactId>
</dependency>

<dependency>
  <groupId>org.springframework.boot</groupId>
  <artifactId>spring-boot-starter-data-redis</artifactId>
</dependency>
其中web的依赖表示我们这是一个web项目,redis的依赖就是我们这边是要验证的功能依赖。随后在application.properties配置文件中增加redis的相关配置如下
spring.redis.host=localhost
spring.redis.port=6379
spring.redis.password=123456
再编写一个Controller和Service类,相关代码如下。
package com.example.demo.controller;

import com.example.demo.service.HelloService;
import org.springframework.beans.factory.annotation.Autowired;
import org.springframework.web.bind.annotation.GetMapping;
import org.springframework.web.bind.annotation.RequestParam;
import org.springframework.web.bind.annotation.RestController;

@RestController
public class HelloController {

  @Autowired
  private HelloService helloService;

  @GetMapping(value = "/hello")
  public String hello(@RequestParam("name") String name) {
return helloService.sayHello(name);
  }

}service代码如下
package com.example.demo.service;

import org.springframework.beans.factory.annotation.Autowired;
import org.springframework.data.redis.core.RedisTemplate;
import org.springframework.stereotype.Service;

@Service
public class HelloService {

  @Autowired
  RedisTemplate<String, String> redisTemplate;

  public String sayHello(String name) {
String result = doSomething(name);
redisTemplate.opsForValue().set("name", result);
result = redisTemplate.opsForValue().get("name");
return "hello: " + result;
  }

  private String doSomething(String name) {
return name + " 欢迎关注 Java 极客技术";
  }

}启动项目,然后我们通过访问http://127.0.0.1:8080/hello?name=ziyou,可以看到正常访问。接下来我们再通过Redis的客户端,去观察一下数据是否正确的写入到Redis中,效果跟我们想象的一致。

自动装配分析
看到这里很多小伙伴就会说,这个写法我天天都在使用,用起来是真的爽。虽然用起来是很爽,但是大家有没有想过一个问题,那就是在我们的HelloService中通过@Autowired注入了一个RedisTemplate类,但是我们的代码中并没有写过这个类,也没有使用类似于@RestController,@Service这样的注解将RedisTemplate注入到Spring IoC容器中,那为什么我们就可以通过@Autowired注解从IoC容器中获取到RedisTemplate这个类呢?这里就是常说的自动装配的功能了。
首先我们看下项目的启动类,
package com.example.demo;

import org.springframework.boot.SpringApplication;
import org.springframework.boot.autoconfigure.EnableAutoConfiguration;
import org.springframework.boot.autoconfigure.SpringBootApplication;
import org.springframework.context.annotation.ComponentScan;

@SpringBootApplication
@ComponentScan(value = "com.example.demo.*")
public class DemoApplication {

	public static void main(String[] args) {
		SpringApplication.run(DemoApplication.class, args);
	}
}在启动类上面有一个@SpringBootApplication注解,我们点进去可以看到如下内容
@Target({ElementType.TYPE})
@Retention(RetentionPolicy.RUNTIME)
@Documented
@Inherited
@SpringBootConfiguration
@EnableAutoConfiguration
@ComponentScan(
excludeFilters = {@Filter(
type = FilterType.CUSTOM,
classes = {TypeExcludeFilter.class}
), @Filter(
type = FilterType.CUSTOM,
classes = {AutoConfigurationExcludeFilter.class}
)}
)
public @interface SpringBootApplication {
   // 省略
}在这个注解中,其中有一个@EnableAutoConfiguration注解,正是因为有了这样一个注解,我们才得以实现自动装配的功能。继续往下面看。
@Target({ElementType.TYPE})
@Retention(RetentionPolicy.RUNTIME)
@Documented
@Inherited
@AutoConfigurationPackage
@Import({AutoConfigurationImportSelector.class})
public @interface EnableAutoConfiguration {
String ENABLED_OVERRIDE_PROPERTY = "spring.boot.enableautoconfiguration";

Class<?>[] exclude() default {};

String[] excludeName() default {};
}可以看到@EnableAutoConfiguration注解中有一个@Import({AutoConfigurationImportSelector.class}),导入了一个AutoConfigurationImportSelector类,该类间接实现了ImportSelector接口,实现了一个String[] selectImports(AnnotationMetadata importingClassMetadata);方法,这个方法的返回值是一个字符串数组,对应的是一系列主要注入到Spring IoC容器中的类名。当在@Import中导入一个ImportSelector的实现类之后,会把该实现类中返回的Class名称都装载到IoC容器中。
一旦被装载到IoC容器中过后,我们在后续就可以通过@Autowired来进行使用了。接下来我们看下selectImports方法里面的实现,当中引用了getCandidateConfigurations方法 ,其中的ImportCandidates.load方法我们可以看到是通过加载String location = String.format("META-INF/spring/%s.imports", annotation.getName());对应路径下的org.springframework.boot.autoconfigure.AutoConfiguration.imports文件,其中就包含了很多自动装配的配置类。
protected List<String> getCandidateConfigurations(AnnotationMetadata metadata, AnnotationAttributes attributes) {
List<String> configurations = new ArrayList(SpringFactoriesLoader.loadFactoryNames(this.getSpringFactoriesLoaderFactoryClass(), this.getBeanClassLoader()));
ImportCandidates.load(AutoConfiguration.class, this.getBeanClassLoader()).forEach(configurations::add);
Assert.notEmpty(configurations, "No auto configuration classes found in META-INF/spring.factories nor in META-INF/spring/org.springframework.boot.autoconfigure.AutoConfiguration.imports. If you are using a custom packaging, make sure that file is correct.");
return configurations;
}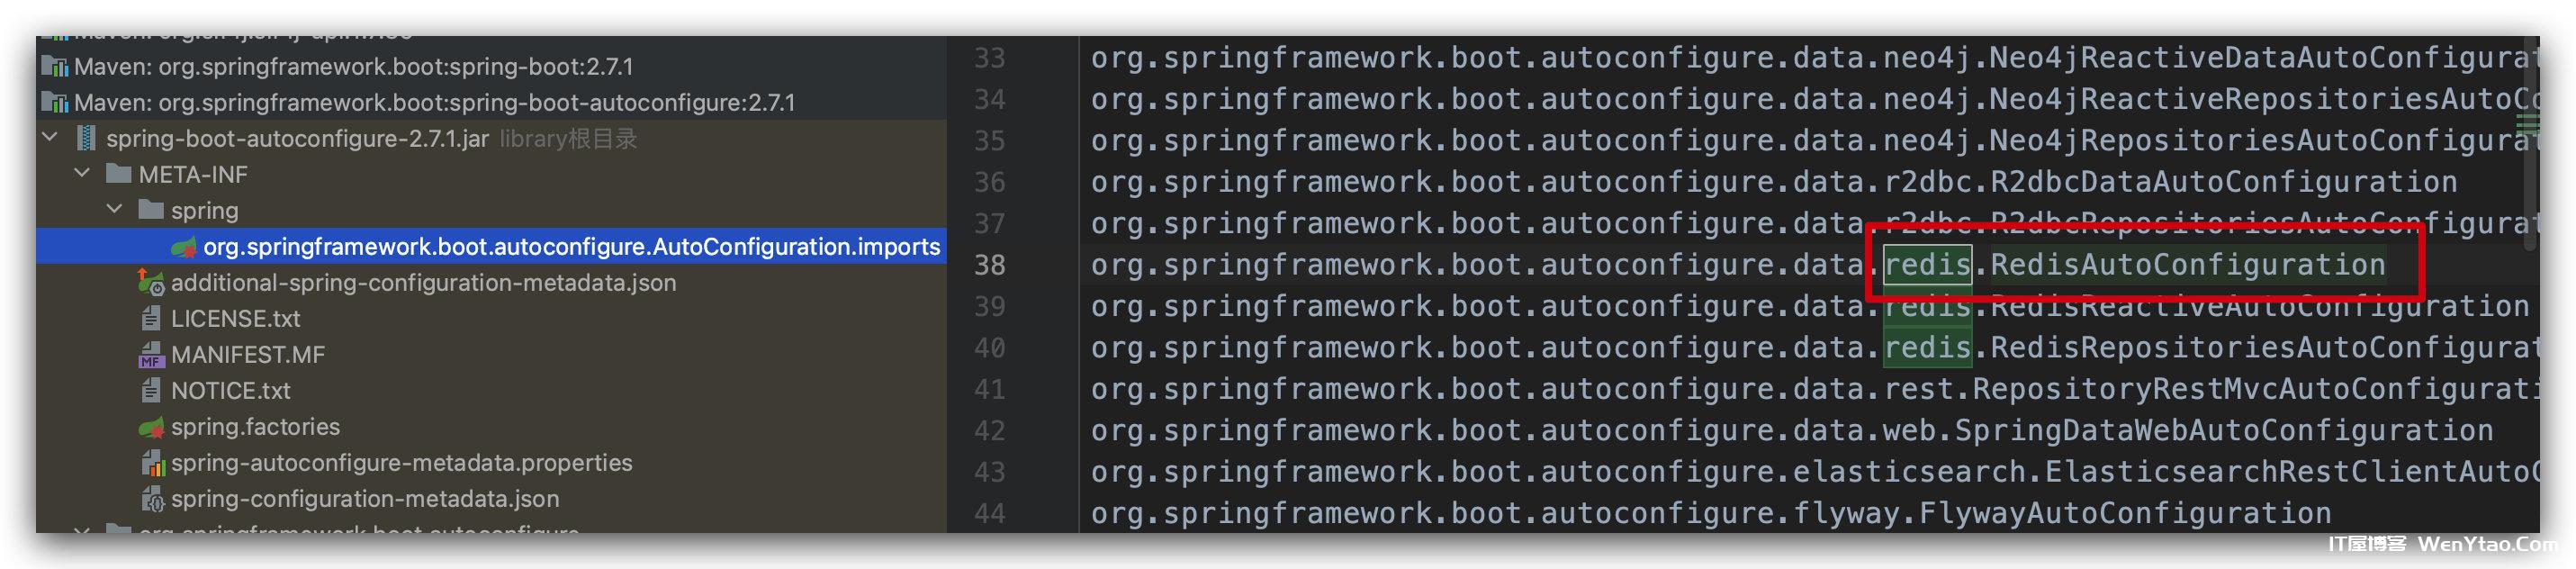
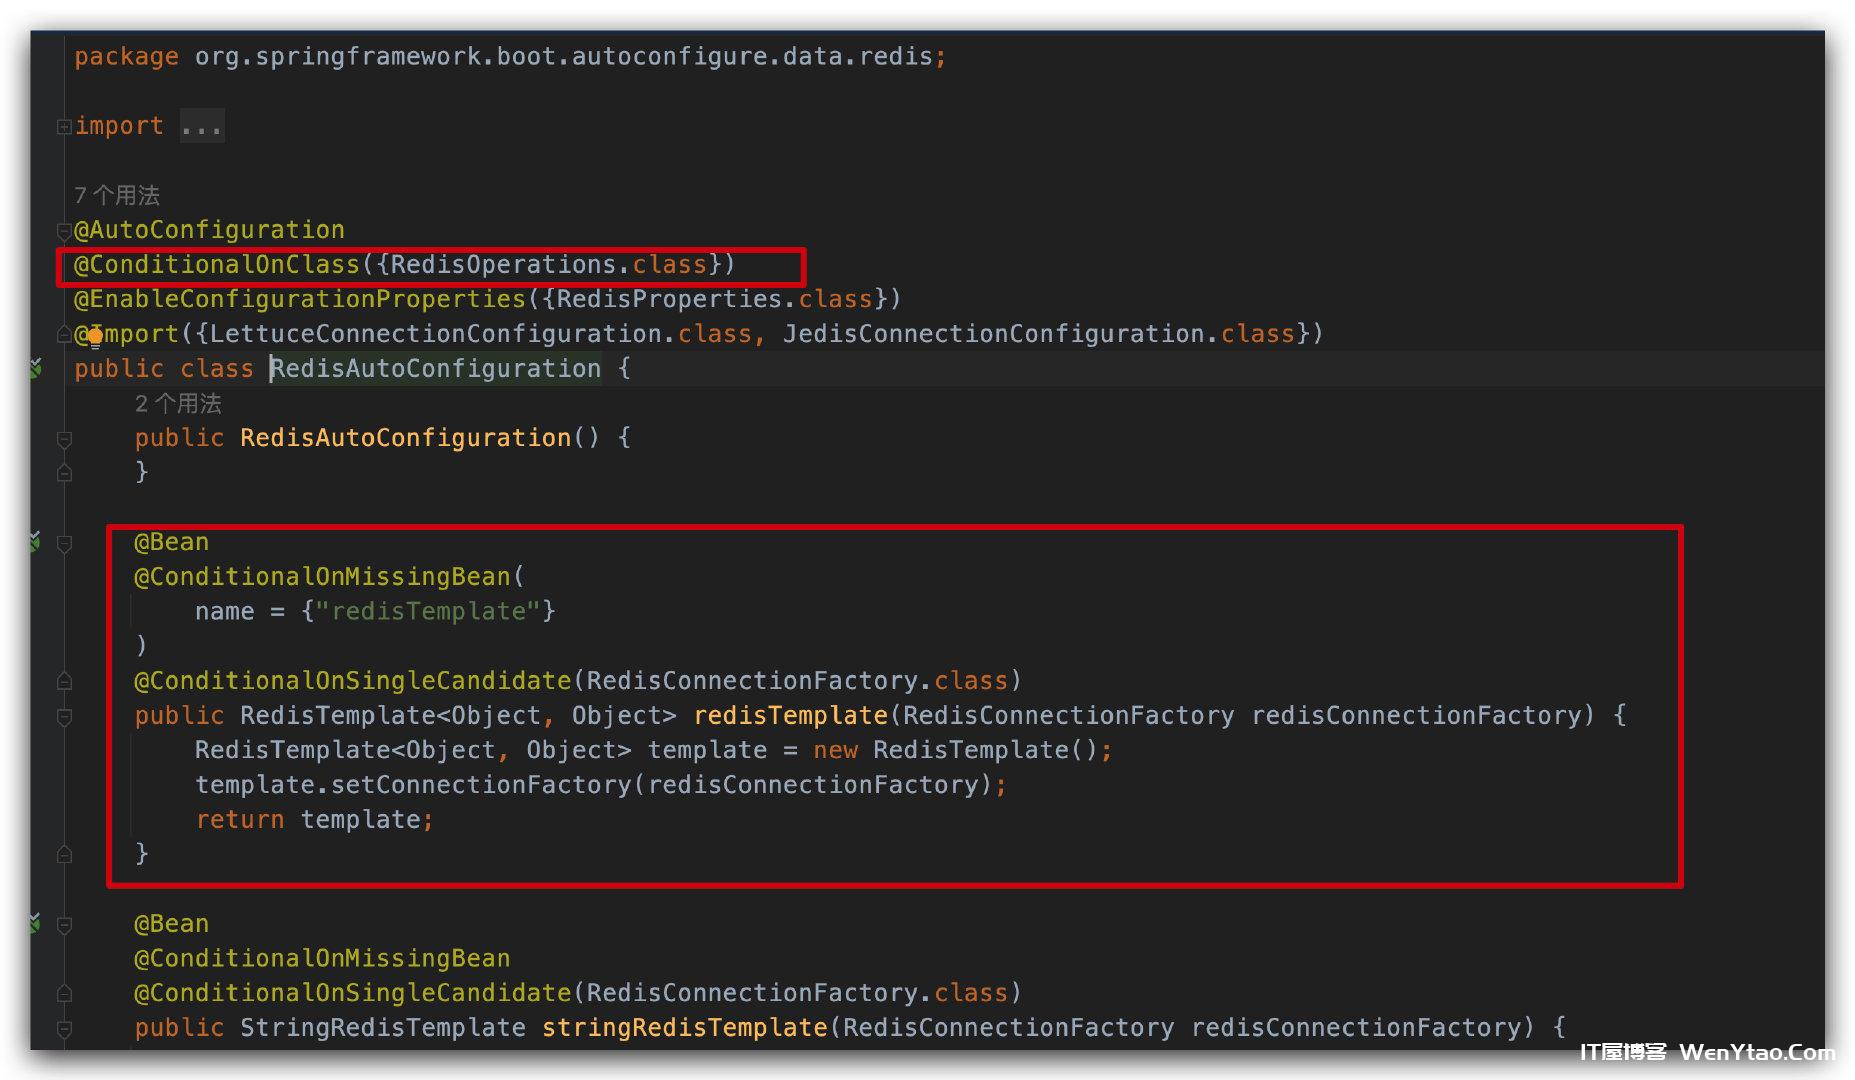
我们可以看到这个文件中有一个RedisAutoConfiguration配置类,在这个配置中就有我们需要的RedisTemplate类的Bean,同时也可以看到,在类上面有一个@ConditionalOnClass({RedisOperations.class})注解,表示只要在类路径上有RedisOperations.class这个类的时候才会进行实例化。这也就是为什么只要我们添加了依赖,就可以自动装配的原因。
通过org.springframework.boot.autoconfigure.AutoConfiguration.imports这个文件,我们可以看到有很多官方帮我们实现好了配置类,这些功能只要我们在pom文件中添加对应的starter依赖,然后做一些简单的配置就可以直接使用。
其中本质上自动装配的原理很简单,本质上都需要实现一个配置类,只不过这个配置类是官方帮我们创建好了,再加了一些条件类注解,让对应的实例化只发生类类路径存在某些类的时候才会触发。这个配置类跟我们平常自己通过JavaConfig形式编写的配置类没有本质的区别。
自动装配总结
从上面的分析我们就可以看的出来,之所以很多时候我们使用SpringBoot是如此的简单,全都是依赖约定优于配置的思想,很多复杂的逻辑,在框架底层都帮我们做了默认的实现。虽然用起来很爽,但是很多时候会让程序员不懂原理,我们需要做的不仅是会使用,而更要知道底层的逻辑,才能走的更远。
基于上面的分析,我们还可以知道,如果我们要实现一个自己的starter其实也很简单,只要安装上面的约定,编写我们自己的配置类和配置文件即可。后面的文章阿粉会带你手写一个自己的starter来具体实现一下。


